Once the video data has been reorganized using Theia3D, the next step is calibrating the collection volume. This section assumes that the calibration trial video data has been properly reorganized (see above section for how to organize the data).
Open Theia3D if it is not already open.
Under the ‘View’ drop-down menu in Theia, click on the ‘Chessboard Calibration’ button which will open the chessboard calibration window on the right side of the screen.
Click on the ‘Load Videos’ button, navigate to the folder that your calibration videos folders are in, and open it.
Next click on the ‘Load Default Intrinsics’ button which will load the default lens calibration for the Sony cameras.
Select your desired frame step (i.e. how many frames will be skipped for every frame used in the calibration process). Our default is 10, meaning every tenth frame will be used.
Select your desired origin frame (i.e. the video frame that will be used to perform the localization part of the calibration). The location of the chessboard in this frame represents where the global origin will be located. It is required that at least 3 cameras have a clear and unobstructed view of the chessboard in this frame.
Click the ‘Calibrate Cameras’ button.
Once the calibration is done, double check it in every camera view. The axes of the coordinate system should line up with the chessboard in the frame selected for localization.
Theia does not automatically save the calibration. Under the 'File' menu, select 'Save Calibration' and name the calibration as desired (Theia does not require a specific naming convention when the calibration is applied later on, so name the calibration as desired) and save the .txt file to the desired location.
Once the video data has been reorganized using Theia3D, the next step is calibrating the collection volume. This section assumes that the calibration trial video data has been properly reorganized (see "Organizing Data, 10a").
Open Theia3D, if it is not already open.
Under the ‘View’ drop-down menu in Theia, click on the ‘Object Calibration’ button which will open the object calibration window on the right side of the screen.
Click on the ‘Load Videos’ button, navigate to the folder that your calibration videos folders are in, and open it.
Next click on the ‘Load Default Intrinsics’ button which will load the default lens calibration for the Sony cameras.
You can now calibrate the volume by assigning points to the calibration object. If you are using the standard lab calibration object, the points will already be loaded in Theia and you just need to assign them to the videos. If you need to use a different object, click the ‘Load Object’ button and navigate to the .txt file with your points included.
Reset all cameras.
One view at a time, to perform the calibration, click on the first point in the list on the right, hold the ‘Ctrl’ key and click on the first point of your calibration object. Theia3D will automatically step to the next point and you can click on the rest of the points on the calibration object in order.
Repeat this process for every camera view.
Note: It is okay to not calibrate every point in every camera view. If there is a point that you cannot see well or at all, you can skip it by simply selecting the next point in the list. When the calibration is done it will automatically populate this point based on its position in the other camera views.Double click to exit camera view.
Once you have all your points annotated for every camera, click the ‘Calibrate Cameras’ button.
Once the calibration is done, double check it in every camera view. The axes of the coordinate system should line up with the lines between the floor tiles and should not be offset.
After double checking the calibration, open the ‘File’ dropdown menu and click ‘Save Calibration’. Navigate to the location where you want to save your calibration, give it a name (CalYYYMMDD), and save it.
To learn how to process trials in depth, visit the Theia3D 2023.1 documentation and the "Theia Tutorial Videos" Page.
There are common practices that our lab follows that deviate from the Theia documentation:
In TMBatch, we set the directory to the 'Project' level of the file hierarchy (See "Organizing Data + Folder Structure" for more details). That way, you can run the batch and it will process all of the data that hasn't been processed yet (using this method, it will automatically skip over already processed data, meaning data that have c3D files).
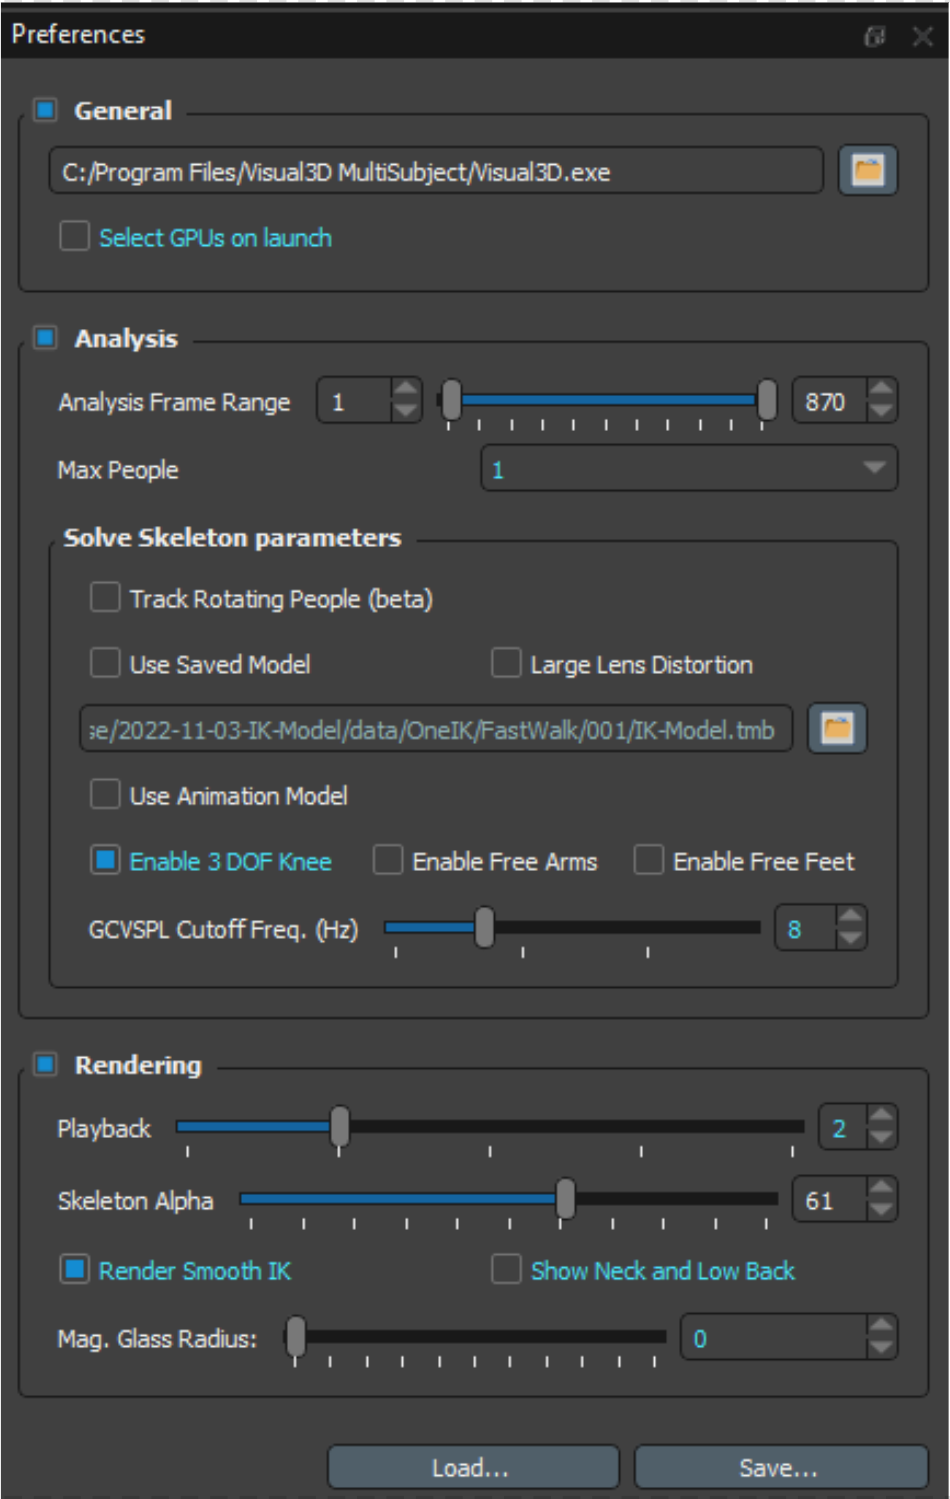
Figure 1 below shows the typical preferences set during out trials (walking and slower movements) including: Max Person 1, GCVSPL Cutoff Frequency 8Hz, and 3 DOF.