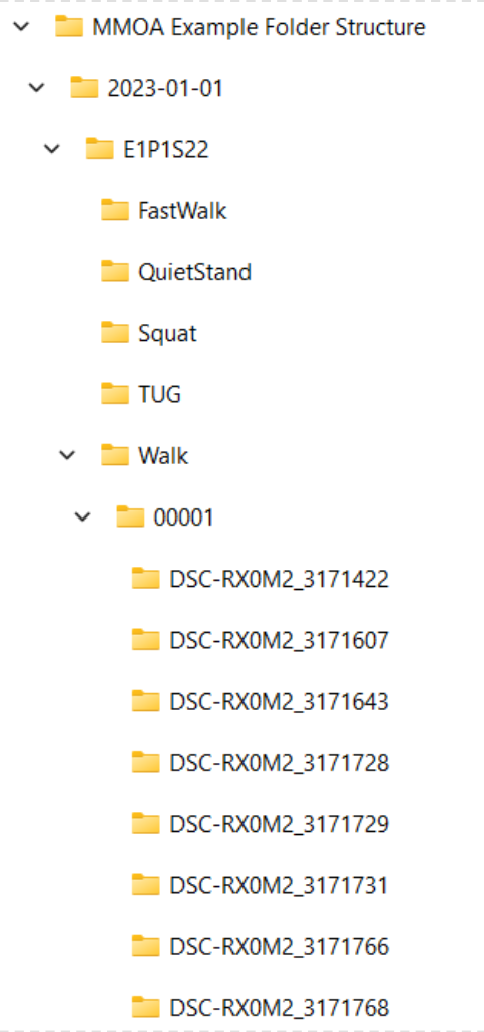
All our data is typically organized in a folder structure as seen below:
[Project]>
[Session] >
[Subject] >
[Action] >
[Trial] >
[Camera] >
[Video]
To achieve this folder structure, follow the 'Organizing Data' steps below.
Before video data can be processed, it must be organized in a specific fashion required by Theia3D. The following steps describe the process of reorganizing downloaded data such that it can be processed using Theia3D.
Open Theia3D
Under the ‘File’ menu, select ‘Organize Videos’. This will open the video formatting window.
For the Sony cameras, choose the ‘Advanced’ option.
Browse to the folder that contains the downloaded videos (it will appear empty) and open it in the formatting window.
In the window you should see all your trials (C000X-X)
Next, define your subjects. To do this, click the ‘Build Subjects’ button. From here you can choose the number of subjects you have. Keep in mind that one of the subjects will have to be for the calibration files so you will need to keep that in mind (For example, you collected data on two subjects, you will need to build three subjects to account for calibration).
Note: For the calibration, the subject name should be "Calibration". Subjects can be named according to the study for which the data was collected, or in a logical fashion if the data is for a one-time use (pilot testing, etc.).Once you have made your list of subjects click ‘Accept’ and close the 'Build Subjects' window. Then choose your first subject from the drop-down menu. When it is selected, select all of the video trials that are to be associated with that subject, click ‘Add’, and then click ‘Finish’. Repeat this for all subjects, including the calibration subject.
Once you have assigned all your video trials to a subject you can add actions to the trials. To do this click on the 'Build Actions' button. Similar to building subjects, you once again need to add the number of actions you have, with an extra action for calibration. When you have added all your actions, click ‘Accept’ and then close the window.
Note: For calibration files, use “Calibration”. Cannot use spaces or dashes. Use CamelCase or use under_scores.Once your actions have been built you can add them to the appropriate video trials by selecting them, clicking ‘Add’ followed by ‘Finish’.
Once you have assigned a subject and action to all the video files, click the ‘Format Data’ button and your data will be reorganized.
Note: Double check the data folder to ensure that the reorganization has worked and that no videos were left out. The data should now be organized as [subject folders] > [action folders] > [trial folders] > [camera folders] > [single video file]. The calibration trial data should be similarly organized, as Calibration (i.e. subject folder) > [trial folder] > [camera folders] > [single video file]; this formatting is required for the next step. You can now process your data, beginning with the calibration.
Open Theia3D.
Under the ‘File’ menu, select ‘Organize Videos’. This will open the video formatting window.
For the Sony cameras, choose the ‘Advanced’ option.
Browse to the folder that contains the downloaded videos (it will appear empty) and open it in the formatting window.
In the window you should see all your trials (C000X-X).
Click the 'Load Subject Action Assignment' and locate your data sheet from that session. Example Data Collection Sheet:: mme/research/hmrl/MMOA/YYYY-MM-DD-subject-action-asssignment.csv Template.xlsx
Make sure that the actions and trials match up.
Once you have assigned a subject and action to all the video files, click the ‘Format Data’ button and your data will be reorganized.
Double check the data folder to ensure that the reorganization has worked and that no videos were left out. The data should now be organized as [subject folders] > [action folders] > [trial folders] > [camera folders] > [single video file]. The calibration trial data should be similarly organized, as Calibration (i.e. subject folder) > [trial folder] > [camera folders] > [single video file]; this formatting is required for the next step.
You can now process your data, beginning with the calibration.
Using Spyder or integrated development environment of choice, open data server to access video files containing QR codes.
Download the theiaQR.py script available on Jereme Outerleys’ Github or using the link provided: https://jouterleys.github.io/mmoa/
Note: If accessing through the HMRL lab server, enter the hmrl-data server (X:) > TheiaUtils . TheiaQR > theiaQR.pyIn the ln53, labelled “barcode_camera_id”, insert the name of the serial number of the QR code data video from the camera.
Browse the search directory and select the data folder containing the video files.
Run the script. Files that do not have a QR code or do not display the QR code within the first 5 seconds of the video will read as “No Barcode Detected". These files will have to be manually rechecked to ensure the QR code is not after 5s mark.
Within the data set folder, open the newly created .csv file called “subject-action-assignments” will be created. Ensure the first row (C0000#) is in sequential order.
Prior to making any changes, copy the .cvs file and label the copy as “subject-action-assignments-fixed”. Make all changes to the copy.
Note: Files without a QR code detected will be flagged as “No Barcode Detected” within the second row. Check the preceding trial to see if the same participant has been previously detected with a barcode. If so, copy the participant barcode in the undetected column. If no other trials exist to draw a participant code from, leave the column marked as “No Barcode Detected”.